If you want to learn some helpful tips on how to use dry ice, then this post is for you.
Advantages of Dry Ice for Camping
Dry ice is way colder than regular ice. It can keep your camping foods and drinks colder longer and cool them down faster. Dry ice can also be used for shipping food items.
Dry ice doesn’t melt like regular ice cubes as it is a solid form of carbon dioxide gas. Rather, it turns to gas from solid. Thus, there will be no mess of residual water in your cooler.
Disadvantages of Dry Ice
Dry ice doesn’t last long. You can’t store it in a freezer or cooler to last longer as the temperature of the freezer is very high compared to the dry ice. So, you will have to buy it just before going camping. Additionally, dry ice can give you frostbite.
Dangers of Dry Ice
Dry ice is known for its extreme coldness. As a matter of fact, it has a temperature of -109.3 F or -78 C, which means it is way colder than a freezer or regular ice. As a result, using dry ice with bare hands could be very dangerous.
There is a huge possibility of frostbite damage if your skin comes in contact with it, so it is always important to use gloves or tongs or thick clothes while working with dry ice.
Another problem with dry ice is that it sublimates, meaning it goes directly into its gaseous form from the solid state without melting.
So, if dry ice is stored in a closed container, it could explode due to the expansion of gas inside the container.
Dry ice is not toxic itself. However, as you know it converts into carbon dioxide gas, which is a dangerous gas to inhale. You should not use dry ice in an enclosed vehicle or room that is not well-ventilated.
How to Use Dry Ice for Fog
You can add pieces of dry ice in hot water to create a fog effect. Dry ice is used for creating fog effects in theatres.
How to Use Dry Ice in Drinks
If you want your drinks frozen, then put the dry ice on top of your drinks. If you just want to keep them cold, you can place dry ice around or next to the drinks in the cooler.
But don’t let them touch each other, otherwise, the beverages will freeze up. To avoid this, you can add newspaper or cardboard to make a barrier between the dry ice and the beverages.
How to Use Dry Ice for Camping
Because of its extremely cold temperature, dry ice can be great camping equipment. It can easily keep camping food and beverages cold without a mess because it won’t melt over time. You can add dry ice to your camping cooler instead of normal ice.
If you will be taking out items from the cooler frequently, it is better to place the dry ice at the bottom. Also, if you want to freeze some food items, then you can store the items directly onto the dry ice.
But if you want to keep everything cool, not frozen, then you should make a barrier between the items and the dry ice using newspapers or cardboard. Do not put dry ice in a shopping bag while transporting or packing it.

How to Choose a Cooler for Dry Ice
Pick A Cooler With Ventilation System
Dry ice will convert into gas over time, so you will need to use a cooler with dry ice that has a good ventilation system for the gas to escape.
There are many coolers specifically designed for dry ice. On those, the lid won’t completely close.
Add Cardboard or Styrofoam inside the Cooler
To protect the walls of the cooler from dry ice’s extreme coldness, you can use cardboard or Styrofoam to lay them at the sides and the bottom of the cooler.
If you are using a Styrofoam cooler, you should leave the lid a bit cracked for the gas to pass.
Take Advantage of the Drain Plug on Your Cooler
Typically, good coolers for overlanding will come with drain plugs. You can remove the drain plug while using dry ice through which the gas will escape.
Otherwise, you have to keep the lid slightly open for the gas to pass.
How to Buy Dry Ice
Wear Gloves While Handling Dry Ice
One of the most important tips is to use gloves, or thick clothes, or tongs while handling dry ice. The extremely cold temperature can burn your skin if it touches dry ice.
How Much Dry Ice Do You Need?
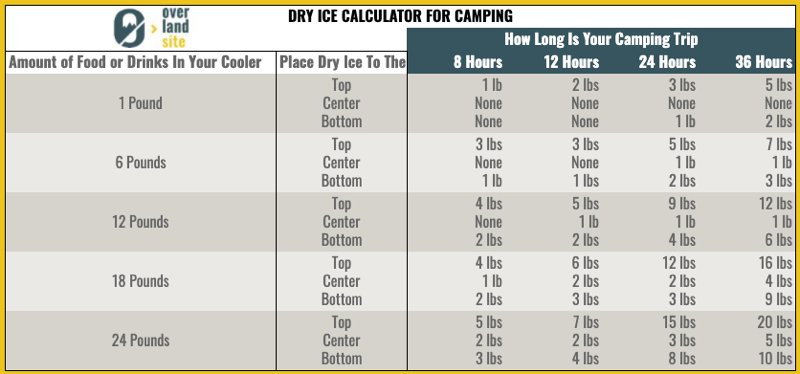
First of all, you will need to determine the amount of dry ice you are going to need. It will depend on the size of the cooler or box where you will store the dry ice. Normally, 5 to 10 lbs. of dry ice can last for up to 24 hours in a good cooler.

Of course, if you use more dry ice and fewer food items, then it will last longer than that. As a rule of thumb, a 40-60-quart cooler can hold up to 10 lbs. of dry ice.
So, based on the size of your cooler and your requirements, you need to determine the amount of dry ice you will need.
Buy in Bulk and Block
Dry ice is a bit expensive. If you want to use dry ice for keeping food cold, then you will need more dry ice than what you would need for just beverages. Normally, dry ice is available in blocks and in pellet size.
It is always better to buy blocks of dry ice. If you buy them in bulk, they will be relatively cheaper as well as will last a long time.
How To Pack a Cooler Using Dry Ice
Use Newspaper As Insulation
If you know how to pack a cooler with dry ice, you will be able to keep it for longer than usual. For instance, you should wrap the blocks of dry ice with newspaper or any type of paper.
It will slow down the evaporation process and act as insulation. Plus, it will also keep you safe from accidentally touching the dry ice.
Should You Put the Dry Ice at the Bottom or Top
On Bottom
Many people are confused about whether to put dry ice at the top or bottom of the cooler. Normally, if you will need to open the cooler frequently to access the items inside, then you should place the dry ice at the bottom, so the dry ice will not be in contact with your skin and it will simply keep the items cold without freezing them up.
On Top
Conversely, if you need to freeze up the food and drinks and you know you will not need to access them frequently, then you can place the blocks of dry ice at the top of the cooler. If you want a fast effect, then you can place the dry ice directly on top of the goods.
So, you can actually put the dry ice either bottom or top of the cooler. It all boils down to your requirements. Keep in mind, foods, and drinks will freeze instantly if they are touching the dry ice blocks directly.
If you want to just keep them chill, then use pieces of cardboard and newspaper to make a barrier between the items and the dry ice.
Avoid Air Spaces or Gaps in the Cooler
Air space is not good for dry ice’s longevity. You should try to pack the cooler with as few gaps as possible. If there are gaps in the cooler, you should add newspaper to fill them up. Air spaces will make dry ice evaporate faster than usual.
How to Dispose of the Dry Ice
The best method to dispose of dry ice is to wait. Simply put the dry ice in a place with good ventilation and wait for it to become gas.
You can add hot water to the dry ice to escalate the process. Always remember to keep it away from children and pets. Also, never keep dry ice unattended when disposing of it.

FAQ – How To Use Dry Ice
How Long Is Dry Ice Good For?
There is no expiration date on dry ice. However, 5 to 10 pounds of dry ice can last for up to 24 hours if you pack them properly. You can use a cooler for camping to increase the lifespan of dry ice. Read our full guide on how long dry ice lasts here.
Can You Use A Cooler with Dry Ice?
Yes, you can use dry ice in a cooler. However, you must keep enough space for the carbon dioxide to escape from the cooler. Either keep the lid open slightly or remove the drain plug of the cooler when storing dry ice.
How Long Will Dry Ice Keep Food Frozen In A Cooler?
It depends on a lot of factors. For instance, one factor is whether the cooler has thick insulated walls or not. In addition, whether you are using newspaper or cardboard to increase the insulation inside the cooler also plays a role. The amount of dry ice and empty space inside the cooler would have an impact.
Usually, if you are packing the cooler properly for keeping food cold, 5 to 10 pounds of dry ice would keep food frozen for 12 to 24 hours.
How Do You Activate Dry Ice?
Before you can use dry ice for creating fog effects, you will need to activate it. To do that, you will have to add hot water to a metal or plastic container.
Remember to half-fill the container, not fully. Then, keep adding a few pieces of dry ice after every 5 to 10 minutes. Keep in mind to add hot water regularly as the water in the vessel will become cold after a while.


